Saturday, October 29, 2011

Halloween Cupcakes!


Aren't these Halloween cupcakes so cute! I made cupcakes and frosting for my boys to decorate just for fun and decided to make some myself and give them to my nieces. All you need for the three types of cupcakes shown here is:

Cupcakes
Frosting
Waffle cones
Pull apart licorice
Black licorice

Pumpkin Cupcake

The pumpkin was the very easiest to do. Just frost it orange and frost a green stem then decorate the face with candies, frosting or whatever you'd like. I piped the mouth on and used Toblerone (I cut it smaller) for the eyes. This one is so easy that my 7 year olds were even able to do it.

Spider Cupcake

The spider cupcake was also pretty easy. I started by frosting the whole cupcake white. The I used a star tip for the body and head of the spider. The hardest part for me on this was the actual spider body because I'm not a very good artist but all in all it turned out okay. Black licorice was used for the legs and then I also added some red pull apart licorice for eyes.

Witch hat and hair cupcake

side view of witch hat and hair

The witch ones were my favorite! First frost the cupcake green (with the left over pumpkin stem frosting). Then cut a waffle cone down to the size hat you'd like. Frost the hat in black (with left over spider frosting). Because these were for my nieces I added sprinkles to make it more girly and cute (also I just like adding sparkly sprinkles to things whenever possible). Then put the cone in the center of the cupcake. Once the cone is in place I put the licorice around about half the cupcake. Once you have as much "hair" as you want on there pipe on some black frosting all the way around the cone for the brim of the hat. This way the "hair" is under the hat. And voila! A fun witches hat with hair!

Sunday, July 10, 2011

Spagetti and Meatball Cupcakes

While on this food themed cupcake kick I made some seriously delicious Spagetti and Meatball Cupcakes! Here is what you'll need:

Cupcakes (whatever your favorite recipe..mine is a delicious made from scratch yellow)
Frosting ( I used my favorite cream cheese recipe)
Ferrero Rocher Chocolates
1 pint halved strawberries
Sugar
Lemon Juice
Water
Cornstarch


1st boiling

2nd boil


RED SAUCE:
I would recommend making the red sauce while the cupcakes bake so that they can both cool at the same time and then when you start frosting and decorating everything will be ready. Here is the sauce recipe:
Boil on medium heat: 1/3 C Sugar, 1 pint halved strawberries, 1tsp. Lemon Juice and 2 TBS. Water. Simmer until somewhat thickened. Cool then puree. Return to saucepan. In bowl combine 1 TBS Cornstartch and 1 TBS Water. Slowly combine Cornstarch mixture with puree. Cook 1-2 minutes or until thick. Cool Completely before using.

While everything was cooling I mixed my frosting and let it sit in the fridge for a while also. I used a cream cheese frosting which is pretty difficult to decorate with since it's so creamy and not very stiff. I knew it would be so tasty with the sauce though and it's the perfect noodle color so I went ahead and tried it. I am so glad I did because it is SO YUMMY!!

Cupcakes cooled and in Disposable dish

BUILDING:
There isn't any building but I did put the cupcakes into a disposable lasagna dish. This was great not only for effect but it kept any sauce that dripped down to the bottom from running off like it could have on a cake board.

Making Noodles


DECORATING:
Okay now that the cupcakes are baked and cooled, the frosting is made and chilled and the sauce is cooked and cooled, the longest and hardest part is over! Now comes the fun and easy part...DECORATING!

The only frosting for this is the noodles and I didn't use any dyes. All I did was use the #233 (grass) tip. Once all the cupcakes were covered well I went back and put some between each of the cupcakes.

Meatballs on top of Noodles

FINISHING:
To finish I put a Ferrero Rocher chocolate on each cupcake. They have the perfect meatball looking texture! Lastly I put the sauce over the spagetti and meatballs. The sauce is so super tasty and combined with the cream cheese frosting is one of my new favorite recipes! I am going to have to find more ways to combine the two! These are YUMMY!

Finished Spagetti and Meatball Cupcakes

Sunday, July 3, 2011

Hamburger Cupcakes

These cute little guys are perfect for a BBQ, picnic or any time you are missing summer. All you need is this:

Chocolate cake
Vanilla cake (lemon or white would work also)
Cupcake pans
Frosting
Sesame Seeds

Chocolate and Vanilla Cupcakes

Building
BUILDING:
Simply cut the white cupcakes in half. This is now your bun. Cut the chocolate cupcakes in half or even thirds (however thick you want your patty) and this is now your meat patty.

cheese/mustard

Ketchup

Lettuce
DETAILS:
Once you have your burgers built just add the condiments. Be sure to put some kind of topping between the bottom bun and meat AND the top bun and meat so that the whole thing stays stuck together. Here is the order I did it in. Yellow cake, Mustard/Cheese (yellow frosting[tip #103 ]), Chocolate Cake, Ketchup (Red Frosting [tip # 7]), Lettuce (Green Frosting [tip #61]) and Yellow Cake.

Hamburger Cupcakes
FINISHING:
The finishing touch is a few Sesame Seeds and voila! A Hamburger cupcake just in time for our 4th of July celebration tomorrow!

Ship Cake

First off let me say this cake could have been so much cuter if I scheduled better and made more time for the details! This was for my twins 7th birthday and I spent so much time getting everything ready for the party that I ended up on a time crunch and was decorating this Late at night when I was far past ready for bed! Luckily everything else for the party was so cute the cake was able to skate by :) Here is what you'll need:

Cake
Frosting
Pretzel Sticks
Pretzel Rod
Soft round candy (taffy, reeses, ect.)
Loaf Pans (big and small)
Construction Paper

Building
BUILDING:
I baked 2 regular sized loaf cakes then 2 mini loaf cakes. The main base is one of the regular loafs. The ends are the second loaf cut into triangles. I stacked 2 on top of each other then placed then on each of the ends. The mini loafs are on top of the main loaf and next to the triangle ends. I cut them on an angle to give it a sloped appearance and try to make more of a boat shaped appearance. I also stuck the pretzel rods aka the sails in to try to decide where I would want them after it was frosted. I have found it's a good idea to toy around with some of your details before you've frosted so you don't have as much frosting to fix once you like where it is.

Frosting
FROSTING:
I only used 2 tips for the frosting on this one and it went super fast! Because I wanted it to look like a wooden ship I was able to do long strokes from end to end. It's chocolate frosting using tip #47 and it helped give it a log or wood like texture.The blue was tip #32 frosted wavy on the bottom to look like water.

Details
DETAILS:
As I said in the beginning of this post this cake could have been so much cuter! I had a lot more detail I wanted to add but the party was in a few hours and I needed to go to bed! So here is what I did do: I used the pretzel rods and construction paper for the sails and the helm is a reeses with pretzel sticks stuck in it (but any round soft candy would work). I tried for a Crows nest but the few things I tried made it too heavy and knocked the sail down so we went without.
Now here is what else I should have done: A Graham cracker plank. One little Graham cracker rectangle stuck off the side would have made an excellent plank! And Whopper Cannon's. Whoppers stuck into the side of the ship could look like the cannons that it could shoot from and would have been awesome!

Finishing
FINISHING:
There weren't any last finishing touches I added before the party really other then a pirate ship balloon to help get the point across of what we were shooting for since this cake was pretty simple. At the end of the day all that matters though is that it is yummy and this one was delicious!!

Thursday, March 24, 2011

Princess Castle

I have never done a girl cake until now! I decided I wanted to do this cake just for fun and was telling a friend about it. When I told her she asked if I would wait and do it for her daughter's birthday that is coming up. I decided to go ahead and try one right now for two reasons. First I was so excited to finally do something girly I couldn't wait and second I wanted to practice once before doing the one for my friend since I have zero experience with girly things. It turned out to be pretty easy and so much fun! I can't wait to do this again and with more detail! Here is what I used:

Cake
Frosting
Waffle cones
Jumbo cones
Regular cones
Sprinkles

Building

BUILDING:
I always build everything before I begin frosting and decorating to make sure everything will fit and stay in place the way I vision it in my head. I used two square cakes stacked for the bottom layer. Then a round dish and a bowl stacked for the top. Against all four corners of the square cake on the cake board I used a jumbo cone with a waffle cone in it. Then on top of the back two corners of the square I used regular cones with waffle cones and lastly I used just a waffle cone for the very top. Once I knew everything would fit and look okay I took the cones off until the very end.

Frosting
FROSTING:
I first used a brown frosting to outline my door and windows using a #7 tip. The door was filled in with the #12 tip. Then I used the #18 star tip for the remainder of the cake (everything purple). This frosting that I used was a new recipe to give it kind of a shimmer look but wasn't very stiff so it made decorating difficult. A royal icing would have looked much neater.

Details
DETAILS:
I used a basting brush to apply Karo Syrup to the waffle cones then sprinkled pink sparkly sprinkles all over them. Then I used some pink frosting to stick them to the cup cones and frosting on the cup cones to stick to the cake and cake board. I frosted the cup cones in the pink frosting and used a zig zag scraper I have to give it a swirled looking texture.

Finishing
FINISHING TOUCHES:
Lastly I used the #233 tip to put grass along the front of the castle and around the front cones. I used the #2 tip to do some vines on both sides of the castle. Then I used the left over pink frosting for a couple drop flowers (tip #107) on the vines and along the grass. I also filled in the windows (#5) and put a door handle on the door. This was my first time trying flowers or vines or anything like that so I was cautious and didn't do many. Next time I do it I think I'll do some more vines and flowers and I will put a stone path to the door.
TADA! Here is the finished product!
Finished Castle Cake!

Monday, March 14, 2011

A Girl Cake...Just Because

Being the mom of all boys I haven't had much opportunity for doing girly cakes. However I have quite the stash of girl decorations! The dye I like is cheapest in a big pack that comes with girl colors as well. I have had to replenish my boy stuff quite a bit which means I keep getting more of the girl stuff that just sits in my cupboard. So I am doing a girl cake. Just because. I'm super excited! I've had this idea in my head for quite some time now and have decided to do it.There will be sparkles, sprinkles, pinks, purples, flowers and so much more! I'll document the process and be sure to post when I'm finished! Stay tuned..

Wednesday, March 9, 2011

Monkey Cake

I can't find the pictures of during the process of the monkey cake. I did this one the same time as the Giraffe cake though and they are VERY similar. For this cake I only used cake and frosting.
Monkey
BUILDING:
Click HERE to see the details of the giraffe cake for help on the head of this cake. The only difference is the ears and the mouth section. The ears are a round pan cut in half and attached with toothpicks. The mouth is the scraps from one of the big bowls. To stack the big bowls I trim the tops to make them flat and this mouth is one of those tops.

Finished Monkey just ignore the 5 yr. olds hand giving bunny ears in the back ground :)

FINISHING:
I frosted it brown and used a caramel frosting for the lighter brown areas then piped the mouth and nostrils. If I did this again I would have attached the ears differently to help them stay closer to the head more securely.

Giraffe Cake

This cake had a lot of firsts for me but turned out pretty good.
Here is what I used:
Cake
Frosting
Pretzels
Toothpicks

Back view built
BUILDING:
This was the first time I tried to bake a cake in a bowl. To get it to cook all the way through use a little bit lower heat setting and cook it longer. Make sure the center is cooked! I used two bowls the same size for the majority of the head and stacked them to make a round head. Before stacking them I trim the tops of so that they are nice and flat and sit flush together. Then I used a third little bowl for the very top of the head. For the ears I used a tiny square and cut it diagonally making two triangles and used those for the ears. For the mouth I used a cupcake.

Front View decorating
DECORATING:
I decorated it in yellow frosting. Then I got to use a cool new tip! It's the #233 tip and is so cool! It can be used for grass or hair and in this case I used it for some hair on the top of its head. I used some black and some brown for the details (spots, eyes, mouth and ears).

Finished Giraffe

FINISHING:
To finish it I used pretzel rods for the horns. I dropped a star of brown frosting on the top of the pretzels to hide where I cut them to shorten them. The only thing I would do differently would be the mouth. It doesn't look quite right to me but overall it was pretty cute for our Jungle themed party.

Dump Truck Cake

I was so happy with the way this dump truck turned out! There is very little cutting or shaping involved so it's a great beginner cake!
Here is what I used:
Cake
Frosting
Oreo's
Chocolate Cake Donuts
Side View of Cake
CAKE:
I baked one rectangle cake, two square cakes, a big loaf and a mini loaf to build this cake.
I wanted the back of the truck to look tilted to emphasize that it's a dump truck. To do this I cut one of the square cakes on an angle. I started at the top right side of the cake and cut down to the bottom left side of the cake. Then I pulled them apart and stacked the two thick sides together so that it angled down. Then I stacked the second square cake on top of that.

Front View of Cake

BUILDING:
After I got the back end situated I stacked the mini loaf on the big loaf and the big loaf on the front of the rectangle. The mini loaf was a little longer then I wanted so I trimmed that down.

Bottom Front Frosted
DECORATING:
To decorate it I frosted it in yellow frosting. Then piped the detail (bumper, grill, truck outline and window) in black frosting. The little boy this was for is named Cam so I made a license plate with his name on it using oreo cream filling and black frosting.

Finished Dump Truck

FINISHING:
The finishing details were the "dirt" it's hauling and the tires. The dirt is just crunched up oreo's and crackers. The wheels are Chocolate cake donuts and the headlights are miniature yellow marshmellows. He turned 3 so there is a three on the top of the cake. The left over dirt I sprinkled on the cake board.
This cake is very cute and easy And it feeds a lot of people!

Train Cake

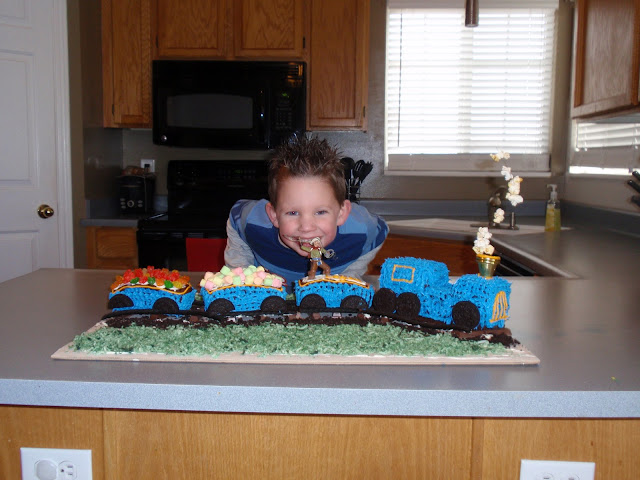
My all time favorite cake so far is the train cake! It is super easy and is absolutely adorable!
Here is a list of everything I used:

Black licorice
Kit Kats
Chocolate cake
Frosting
Oreo's
Gummy Bears
Marshmellows
Popcorn
Coconut


The tracks

TRACKS:
The kit kats and licorice made the tracks. I had a hard time getting the licorice to balance on the kit kats and thought about using frosting to glue them together but when I placed the cake on top everything stayed in place pretty well and I didn't end up needing to use any frosting. If you were going to transport the cake then I would recommend using a little frosting to make sure everything stays.

The train
CAKE:
I baked 4 mini loafs and one big loaf. Three of the mini loafs are the cars and the one big one is the front of the train. The last mini loaf I used for the front of the train.

Details
DETAILS:
I used a #18 star tip to frost the majority of the train (everything in blue). The tops of the mini loafs I just frosted white so that the gummy bears and marshmellows would stick. The third car I left white to pipe my sons name on and to put the cowboy on. Then I put oreo's on for the wheels and piped a yellow window and a yellow grill on the front. For the piping I used a #5 tip.

The Finished Train
FINISHING:
The finishing touches were the popcorn steam and the coconut grass. I also crumbled some Oreo's up for dirt around the tracks. The popcorn is on threaded onto a piece of thin craft wire and stuck into the cake. I tried big white marshmellows and mini marshmellows but they were to heavy. The popcorn works great and looks awesome! The coconut I put in a bag with some green dye and mushed  it until it was the color I wanted and then sprinkled it onto the cake board. This was the finished product! My cowboy of a little boy was thrilled and it was a huge hit at the party!